Next.js Turbopack Overview
When working with Next.js, you'll likely come across options like next dev --turbo or next dev --turbopack when starting the development server. Turbopack is a bundler introduced to make the Next.js development experience faster.
The word "bundler" might sound intimidating at first. Simply put, it's a tool that takes the JavaScript, TypeScript, and CSS files a developer writes and packages them into a form that browsers can understand and execute. Next.js has historically relied on Webpack, and Turbopack is the newer alternative built to handle that same job faster.
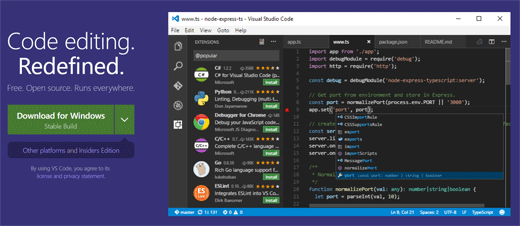
The Next.js development server and bundler are involved in the pipeline from code changes to browser updates.
This post covers the fundamentals of Turbopack for anyone encountering it for the first time, then walks through the issues you're likely to hit in practice: Docker container and volume bind mount problems, file change detection issues, and compatibility concerns worth keeping in mind.
What Is Turbopack
Turbopack is a Rust-based bundler built by Vercel. The Next.js documentation describes it as an incremental bundler optimized for JavaScript and TypeScript.
The key word here is incremental. Rather than reprocessing everything from scratch on every change, it focuses on recalculating only what's affected by the modified file. During development, the loop of editing a file and verifying the result in the browser repeats constantly. Turbopack is designed to make that loop faster.
This isn't a knock on existing bundlers. Webpack has been widely used for years and has a large ecosystem. But as projects grow, startup time for the development server and hot-reload latency tend to increase. Turbopack was built to address exactly that.
Bundlers, Simply Explained
A frontend project has a lot of files. You might have page.tsx, layout.tsx, button.tsx, style.css, images, and fonts all living separately.
Browsers don't automatically figure out how all these files relate to each other. A build tool has to read the dependency graph, assemble the files in the right order, and prepare everything in a form the development server can deliver to the browser. That's what a bundler does.
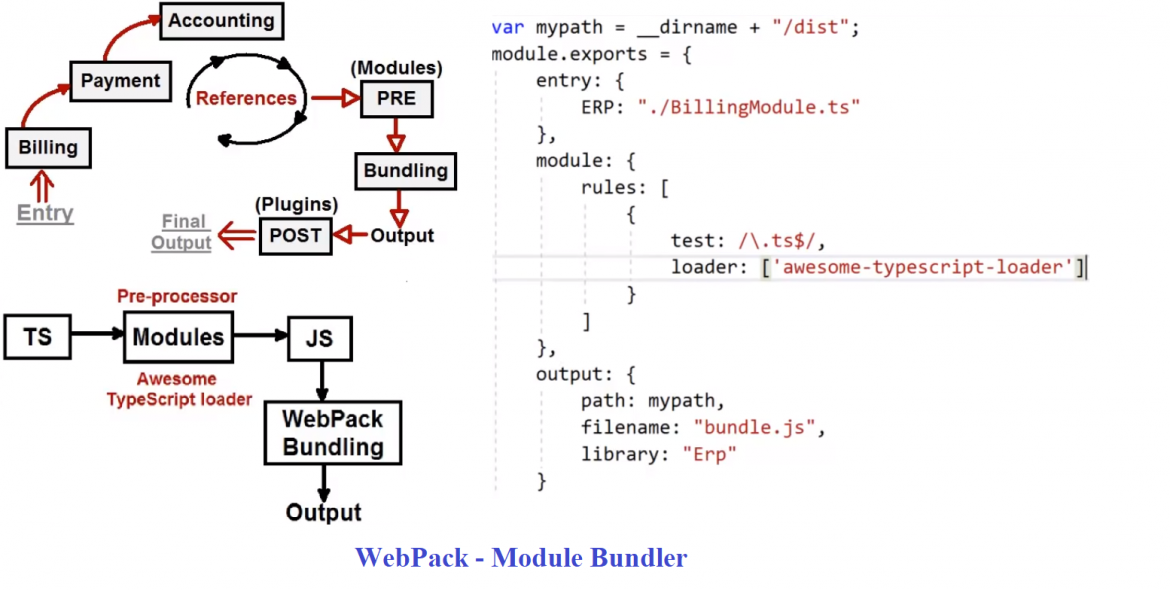
A bundler reads the relationships between files and prepares output the browser can execute.
To summarize, a bundler:
- Resolves the dependency graph across files.
- Transforms code that needs it, like TypeScript or JSX.
- Handles CSS and image assets.
- Produces output the browser can run.
- Re-applies changes when files are modified during development.
Turbopack's focus is particularly on speeding up that last point — the repeated update cycle during development.
How to Enable Turbopack
In Next.js, Turbopack is enabled via a flag when starting the development server. The Next.js CLI docs describe the --turbo option for next dev.
The simplest way to run it:
next dev --turbo
Add it to package.json as a script so you don't have to type the flag every time:
{
  "scripts": {
    "dev": "next dev --turbo"
  }
}
Then run:
npm run dev
If your project uses pnpm:
{
  "scripts": {
    "dev": "next dev --turbo"
  }
}
pnpm dev
Depending on the Next.js version, the flag may appear as either --turbo or --turbopack. Check the CLI help for whichever version your project uses.
Why Turbopack Feels Fast
Turbopack's speed isn't simply a result of being written in Rust. Rust is a performance-friendly language, but the language alone doesn't make a development server fast.
The real driver is the architecture: only reprocessing what changed. When you edit a single file, instead of re-reading and re-bundling the entire project, it scopes its work to the modified file and whatever depends on it. The larger the project, the more noticeable this difference becomes.
There's also the question of what matters during development. Getting a finished production build is less important than fast feedback. Reducing the time between a code change and seeing the result in the browser keeps you in flow. Turbopack is designed with that development-phase feedback loop as the primary target.
Webpack vs. Turbopack
The most obvious difference between Webpack and Turbopack is their purpose and when they were designed.
Webpack is a general-purpose bundler with a mature ecosystem. It supports a wide range of plugins and loaders, and has been used across countless frameworks and libraries. With enough configuration, it can handle nearly any frontend build scenario.
Turbopack was purpose-built to make modern JavaScript and TypeScript development with Next.js faster. It doesn't extend through the same configuration model as Webpack. That gives it a speed advantage, but projects that depend heavily on Webpack plugins may not be able to switch over immediately.
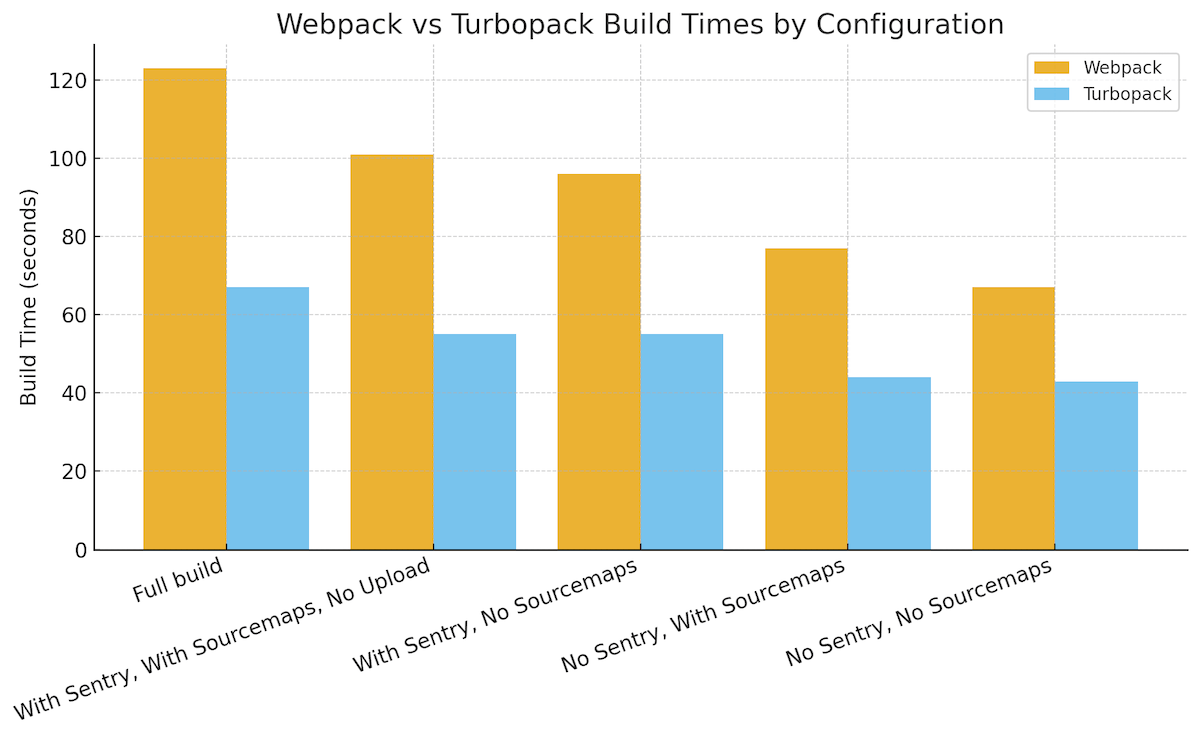
Turbopack uses a different architecture from Webpack, targeting faster development feedback.
In short:
- Webpack's strengths are its mature ecosystem and broad compatibility.
- Turbopack is focused on fast dev-server feedback for Next.js.
- Projects with heavy Webpack customization need to audit compatibility before switching.
- New projects or those with minimal configuration can try Turbopack relatively easily.
Turbopack Doesn't Solve Everything
Turbopack can speed up your development server, but assuming it will work flawlessly in every project is risky. Projects that rely on custom Webpack configuration, custom loaders, or non-standard module handling may encounter behavioral differences.
The supported features section of the Next.js Turbopack documentation calls out differences from Webpack explicitly. These differences matter in real projects — if the dev server is faster but certain packages or CSS processing behaves differently, you'll end up spending that time on debugging instead.
A safer approach, especially if you're newer to this:
- On a new project, enable Turbopack and see how it goes.
- On an existing project, create a separate branch and test there first.
- If you've made significant manual changes to Webpack config, don't switch yet.
- Keep a way to fall back to the Webpack dev server if something breaks.
For example, you can keep both scripts in package.json:
{
  "scripts": {
    "dev": "next dev",
    "dev:turbo": "next dev --turbo"
  }
}
This makes it easy to compare behavior side by side when Turbopack causes an issue.
Why Docker and Turbopack Can Be Tricky
It's common to run the Next.js dev server inside a Docker container and use a bind mount to connect local source code into the container.
A Docker bind mount connects a directory on the host machine to a path inside the container. For example, mounting your project folder to /app in the container makes the same files visible from inside it.
The problem is how the dev server watches for file changes. Tools like Turbopack and Webpack continuously monitor the filesystem for modifications. But in Docker Desktop on macOS or Windows, there's a boundary between the host filesystem and the Linux container filesystem. Across that boundary, file change events can be delayed or may not arrive in the expected form.
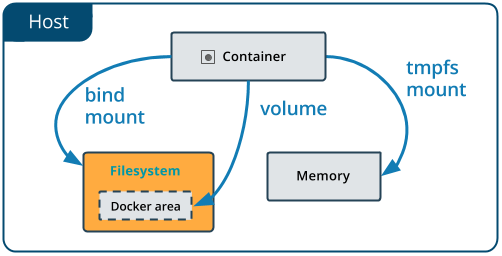
Docker bind mount connects host files to a path inside the container.
This is especially confusing if you're new to the setup. Symptoms might include changes not reflecting in the browser, needing to restart the dev server after saves, or unexpectedly high CPU usage.
Common Symptoms with Docker Volume Binds
When using Docker and Turbopack together, the issues that appear are usually related to file change detection:
- Editing a file doesn't immediately update the browser.
- Changes appear several seconds after saving.
- A new file is created, but the corresponding route or component isn't recognized.
- Changes only appear after restarting the dev server inside the container.
- Mounting
node_modulesfrom the host causes dependency conflicts. - Overall performance is noticeably worse on macOS or Windows running a Linux container.
These problems aren't solely Turbopack's fault. The behavior of Docker bind mounts, OS differences, filesystem watching implementation, Next.js version, and project structure all play a role.
The Most Common Mistake: Mounting node_modules Incorrectly
One of the most frequent mistakes in a Dockerized development setup is mounting the entire project directory without handling node_modules separately.
This configuration looks reasonable on the surface:
services:
  app:
    volumes:
      - .:/app
But it overwrites the entire /app directory in the container with the host project folder. If node_modules was installed inside the container during the image build, the volume mount can shadow it in unexpected ways.
The standard fix is to give node_modules its own volume:
services:
  app:
    volumes:
      - .:/app
      - /app/node_modules
This mounts the source code from the host while keeping the container's node_modules isolated. Depending on your project and package manager, additional tuning may be needed — but this is the first thing to check.
Turbopack and File Watching
The dev server needs to detect file changes. In a typical local environment, it receives filesystem events and reacts quickly. In a Docker bind mount setup, event delivery is affected by the OS and the Docker Desktop implementation.
When file watching is unreliable, polling can help. Instead of waiting for filesystem events, polling checks at a fixed interval whether files have changed. It tends to be more reliable but increases CPU usage.
It's hard to say that any single environment variable will fix every file-watching problem with Turbopack in Docker. When you suspect file change detection issues, a methodical approach works better:
- Run the same project outside Docker and compare behavior.
- Test
next devandnext dev --turboseparately to see if the behavior differs. - Verify that the bind mount path isn't overwriting the entire project directory unintentionally.
- Make sure
node_modulesisn't being shared between host and container. - Test new file creation and edits to existing files separately to see which is affected.
The dev server watches for file changes and pushes updated results to the browser.
Working through these steps lets you narrow down whether the issue is Turbopack itself, the Docker filesystem boundary, or project configuration.
Docker Compose Example
The example below shows a minimal Docker Compose setup for running a Turbopack dev server. Real projects will need adjustments for Node version, package manager, ports, and environment variables.
services:
  web:
    image: node:20-alpine
    working_dir: /app
    command: sh -c "npm install && npm run dev:turbo"
    ports:
      - "3000:3000"
    volumes:
      - .:/app
      - /app/node_modules
    environment:
      - HOSTNAME=0.0.0.0
To access the Next.js dev server from outside the container, the server must not bind only to localhost inside the container. The Next.js CLI provides a hostname option for this.
You can set it explicitly in the script:
{
  "scripts": {
    "dev:turbo": "next dev --turbo -H 0.0.0.0"
  }
}
The container exposes port 3000, and you access it from the host at localhost:3000.
Troubleshooting Turbopack: A Systematic Approach
When something breaks after enabling Turbopack, resist the urge to immediately tweak complex settings. Work through a simple, ordered checklist first.
Step one: disable Turbopack and check whether the problem persists.
npm run dev
npm run dev:turbo
If the two commands behave differently, the difference is likely Turbopack-related. If they behave the same way, Docker, dependencies, Next.js configuration, or the code itself is the more likely culprit.
Step two: run outside Docker.
npm install
npm run dev:turbo
If everything works fine outside Docker but breaks inside it, the problem is almost certainly a bind mount or container environment issue.
Step three: distinguish between new-file creation and existing-file modification. If edits to existing files are reflected correctly but newly created files are picked up slowly, the issue is likely with the file-watch scope or event propagation.
A Known Caveat: Don't Expect Webpack Config to Just Work
Turbopack is not simply a faster drop-in replacement for Webpack — it is a fundamentally different bundler architecture. You cannot assume that Webpack configuration carries over unchanged.
For example, projects that configure Webpack-specific plugins or loaders directly may find that those configurations are not handled the same way under Turbopack. The Next.js documentation explicitly distinguishes supported features from unsupported or unplanned ones.
The rule of thumb for anyone new to this is straightforward: if you are directly modifying Webpack config in next.config.js or next.config.mjs, be extra careful before switching to Turbopack.
const nextConfig = {
  webpack: (config) => {
    // Webpack-specific configuration
    return config
  }
}

module.exports = nextConfig
If your project contains code like this, do not assume it will behave the same way under Turbopack.
Distinguishing Performance Issues from Bugs
Slow or unexpected behavior after enabling Turbopack is not automatically a Turbopack bug. Separating performance issues from bugs makes it much easier to find the root cause.
Performance issues typically look like this:
- The dev server starts slowly.
- There is a long delay between saving a file and seeing the change.
- CPU usage is high.
- It is slow only inside Docker.
Bug-like symptoms look more like this:
- Editing a specific file always throws an error.
- A module resolves fine under Webpack but cannot be found under Turbopack.
- Importing a specific package fails only under Turbopack.
- CSS or image processing produces different results.
The appropriate response differs depending on which category you're in. For performance issues, look at Docker volumes, file watching, project size, and caching. For bug-like issues, check Turbopack's supported feature set, the Next.js version, and try to reproduce the problem with a minimal example.
Recommended Approach for Getting Started
If you are new to Turbopack, avoid forcing it across your entire development environment from day one. Keep both options available so you can compare them.
Set up package.json like this:
{
  "scripts": {
    "dev": "next dev",
    "dev:turbo": "next dev --turbo",
    "build": "next build"
  }
}
Use dev:turbo locally and fall back to dev for comparison when something goes wrong. In Docker, first confirm that the standard dev script runs stably, then try adding dev:turbo.
The reason this order matters: changing too many variables at once makes it hard to isolate the cause. If you simultaneously upgrade the Next.js version, introduce Docker, change the volume setup, switch the package manager, and enable Turbopack, pinpointing what broke becomes very difficult.
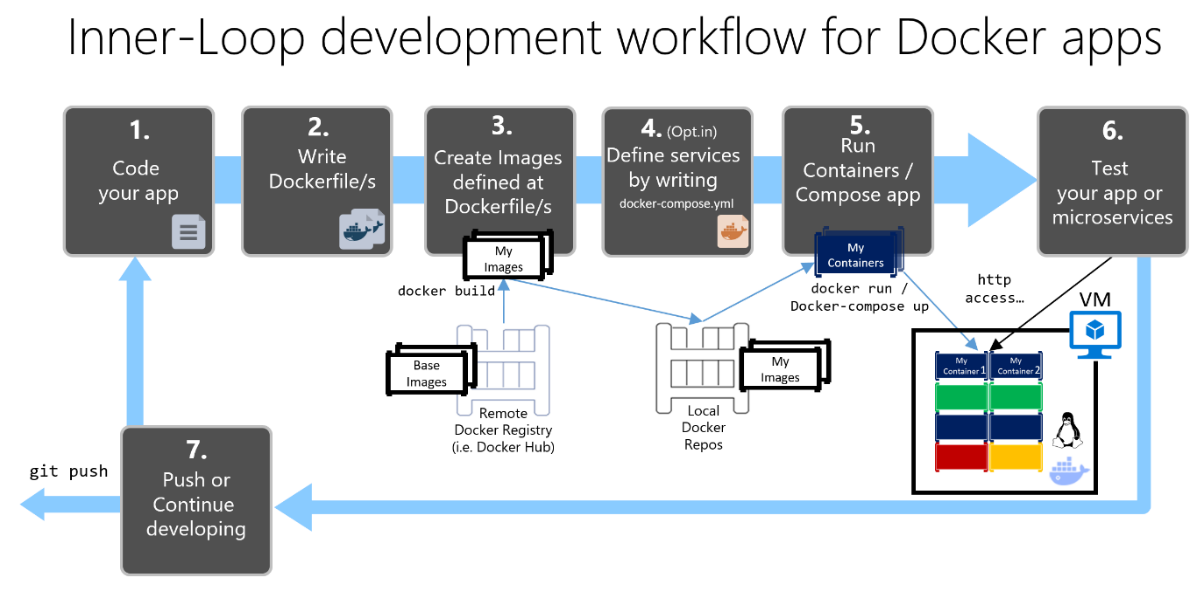
In Docker-based development, it is important to reason about the boundaries between your code, the container, and the dev server separately.
Summary
Turbopack is a Rust-based bundler designed to speed up the Next.js development server. Rather than reprocessing everything on each change, it focuses recomputation on only the parts that changed. As a result, it can meaningfully reduce feedback loop latency as your project grows.
That said, Turbopack is not a complete, drop-in clone of Webpack. Projects that rely on Webpack-specific configuration or plugins may encounter differences.
When running inside a Docker container, bind mounts and file-change watching become intertwined concerns. On macOS or Windows with Docker Desktop in particular, the boundary between the host filesystem and the Linux container can make change detection feel slow or unreliable.
In practice, the safest approach is to keep separate dev and dev:turbo scripts and compare behavior both inside and outside Docker. Turbopack is a fast tool, but it is just as important to maintain a stable fallback you can return to when something goes wrong.