Related Series
More — Related Series List
- 2024.11.11 - [A.I. & M.L./LLM] - [LangGraph] 1. Managing AI Workflows with LangGraph
- 2024.11.13 - [A.I. & M.L./LLM] - [LangGraph] 2. A Conceptual Understanding of LangGraph's Core Components (current post)
- 2024.11.14 - [A.I. & M.L./LLM] - [LangGraph] 3. Implementing Workflows with Chains and Agents — Query Extraction Model
- 2024.11.20 - [A.I. & M.L./LLM] - [LangGraph] 4. Building a RAG and Search Agent with LangGraph
The previous post gave a brief introduction to LangGraph.
This time, the goal is to understand how LangGraph's three core components — State, Node, and Edge — actually work.
If you need additional information, refer to the tutorials provided in the official LangGraph documentation (link).
1. State
At its core, LangGraph can be understood as a connected collection of various tools (more precisely, Nodes).
The tools in question span a wide range — search engines, web drivers, large language models, and more.
Because so many different tools are woven together into a single workflow,
we need a globally shared "state" that all of them can access.
In plain terms, State is simply the space where global variables are managed.
This is why every node in the graph communicates through this shared State.
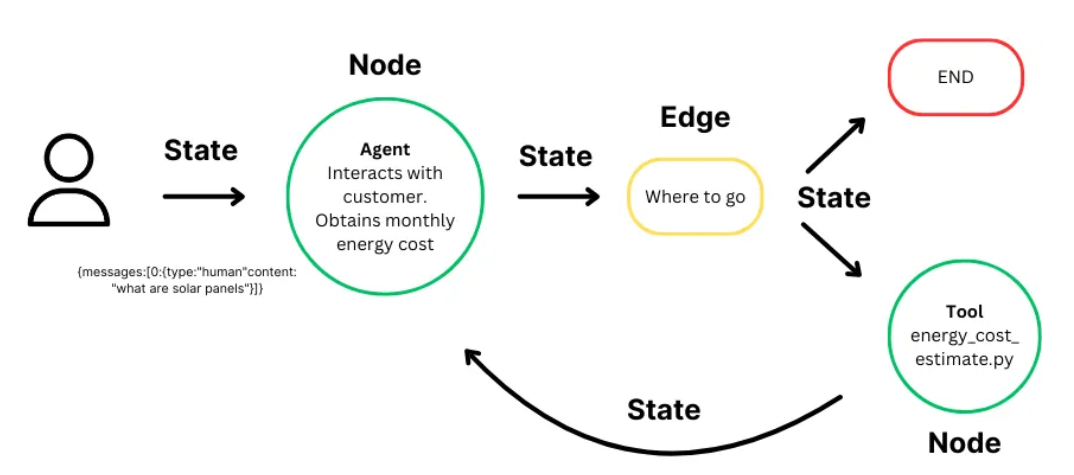
What gets passed around? State does. (Oudenhove, 2024. Medium)
class ExampleState(TypedDict):
    x: int
    y: float
    sentence: str
    queries: list
In LangGraph, State is managed using TypedDict, as shown above.
TypedDict is a data structure introduced in Python 3.8. It works just like a regular dictionary, but lets you declare types for each field.
Each field in the TypedDict is updated whenever a new value is assigned, and nodes can be directed to perform specific tasks based on the current values in State.
To summarize: State is the globally shared variable space through which Nodes communicate.
2. Node
A Node can be thought of as a functional unit within the overall workflow.
At its simplest, you can think of it as a "function" that handles a specific task.
In fact, the most basic Node is nothing more than a plain Python function.
Let's look at an example.
from typing_extensions import TypedDict

# State
class ExampleState(TypedDict):
     number: int

# Node
def make_squered_node(state: ExampleState):
     return {number: (state['number'])**2}
As you can see, a Node can be defined very simply.
That said, it's worth understanding the characteristics that LangGraph Nodes have.
make_squered_noderequires anExampleStateobject as its INPUT.make_squered_nodecan access any variable defined inExampleState.- After performing its logic using those variables, it returns a State in the form expected by the next Node.
In other words, every Node in the graph is connected based on the schema defined in State,
and forming those connections clearly is arguably the most important thing to get right.
This is essential for achieving the ultimate goal of LangGraph: stable, reliable Agent behavior.
Now let's take a quick look at the Annotated syntax, which comes up frequently in LangGraph.
from typing import Annotated

name: Annotated[str, "이름"]
location: Annotated[str, "거주지"]
Annotated is one of Python's type-hinting mechanisms.
However, it isn't used here merely to improve code readability.
LangChain and LangGraph use Annotated to implement a variety of functional behaviors, so it's worth understanding properly.
Let's look at two representative examples.
# 1. messages의 관리

from typing import Annotated
from typing_extensions import TypedDict
from langgraph.graph.message import add_messages

class State(TypedDict):
    messages: Annotated[list, add_messages]
Here we define a State similar to what we saw earlier.
The messages field takes add_messages as its Annotated argument.
This is a LangGraph-specific pattern that says:
manage the messages between the user and the LLM using the add_messages function.
The add_messages function takes a list of Messages-typed arguments and merges them together.
from langchain_core.messages import AIMessage, HumanMessage
from langgraph.graph import add_messages

msgs1 = [HumanMessage(content="Hello", id="1")]
msgs2 = [AIMessage(content="Hi there!", id="2")]

result = add_messages(msgs1, msgs2)
print(result)

# [HumanMessage(content='Hello', additional_kwargs={}, response_metadata={}, id='1'), AIMessage(content='Hi there!', additional_kwargs={}, response_metadata={}, id='2')]
LangGraph uses this pattern to manage the flow of messages between the user and the LLM.
Next, let's look at how Annotated is used with LangChain's with_structured_output.
Take a look at the code below.
# 2. Annotated를 이용한 Structured Output 만들기

from typing_extensions import Annotated, TypedDict
from langchain_openai import ChatOpenAI

# TypedDict
class Joke(TypedDict):
    """Joke to tell user."""
    # json형태의 parsing을 위해 아래와 같이 구성된다.
    # key명칭: Annotated[value의 타입, 기본값, 설명]

    setup: Annotated[str, ..., "The setup of the joke"]
    punchline: Annotated[str, ..., "The punchline of the joke"]
    rating: Annotated[Optional[int], None, "How funny the joke is, from 1 to 10"]

llm = ChatOpenAI(model="gpt-4o-mini")
structured_llm = llm.with_structured_output(Joke)
structured_llm.invoke("Tell me a joke about cats")

# Output:
{'setup': 'Why was the cat sitting on the computer?',
 'punchline': 'Because it wanted to keep an eye on the mouse!',
 'rating': 7}
It's straightforward: define a TypedDict class and populate its fields using the format shown above.
This lets you constrain the LLM's output to a specific structure, making the system far more robust.
3. Edge
Returning to Edges — functionally speaking, an Edge receives State and passes State along.
(From a purely functional perspective, you could even think of it as a lightweight "node" that handles simple routing.)
For simple, linear connections, there's nothing special to configure — LangGraph handles it automatically.
However, if you want to route to different nodes based on a condition or state value, you can do so like this:
from typing_extensions import TypedDict
from typing import Annotated
from langgraph.graph import StateGraph, START, END

# graph_builder를 통해 그래프의 요소들을 구성한다.
# 이후 예제에서 더 자세하게 살펴볼 것이니 일단 넘어가자.
graph_builder = StateGraph(State)

# 다음과 같이 ask_human이라는 전역적 변수가 추가된 State가 있다고 해보자.
class State(TypedDict):
    messages: Annotated[list, add_messages]
    ask_human: bool

# 만약 해당 변수가 True인 경우 "human"이라는 값을 반환한다.
# 아니라면 "next_node"라는 값을 반환한다.
def select_next_node(state: State):
    if state["ask_human"]:
        return "human"
    return "next"

# add_conditional_edges는 graph_builder가 사용하는 함수 중 하나로
# 상태에 따라서 다른 노드로 연결되도록 한다.
# 여기서는 llm 이라는 노드에서 human_node 또는 next_node로 연결하도록 한다.
# 이것을 관리하는 라우팅은 앞서 정의한 select_next_node가 결정하는 것이다.

graph_builder.add_conditional_edges(
    "llm",
    select_next_node,
    {"human": "human_node", "next": "next_node"}
)
In short, the routing destination changes based on the value of ask_human in State.
The key takeaway here is that a specific State value emitted by the previous Node becomes the "key" for routing.
In other words, to implement conditional branching, you need to control the State value returned by the branching node so that it can drive the routing decision.
Once you internalize this, even complex graph structures become straightforward to implement.
This post aimed to build a conceptual understanding of LangGraph's three core components.
To summarize:
-
State is the global variable space for the graph. It is used across many parts of the system — inter-node communication, routing decisions in Edges, and more.
-
A Node is essentially a function: it performs a specific task and returns an updated State.
-
An Edge is a lightweight Node that handles simple routing — it receives State as input and passes State as output.
Some details have been omitted or simplified in the interest of clarity, but this level of understanding is sufficient for grasping what LangGraph is and how it works.
The next post will put these concepts into practice by building a Graph that combines an LLM with an Agent.