Related Series
See more
Related Series List
- 2024.11.11 - [A.I. & M.L./LLM] - [LangGraph] 1. Managing AI Workflows with LangGraph (current post)
- 2024.11.13 - [A.I. & M.L./LLM] - [LangGraph] 2. A Conceptual Understanding of LangGraph's Core Components
- 2024.11.14 - [A.I. & M.L./LLM] - [LangGraph] 3. Implementing Workflows with Chains and Agents — Query Extraction Model
- 2024.11.20 - [A.I. & M.L./LLM] - [LangGraph] 4. Building a RAG and Search Agent with LangGraph
1. The Rise of the LangChain Ecosystem
As large language models continue to improve rapidly,
a wide variety of workflows have emerged for integrating them into applications.
LangChain was the first language model framework to gain traction in this space,
establishing itself as an effective orchestration tool for implementing features such as Chains, Retrieval, and Agents.
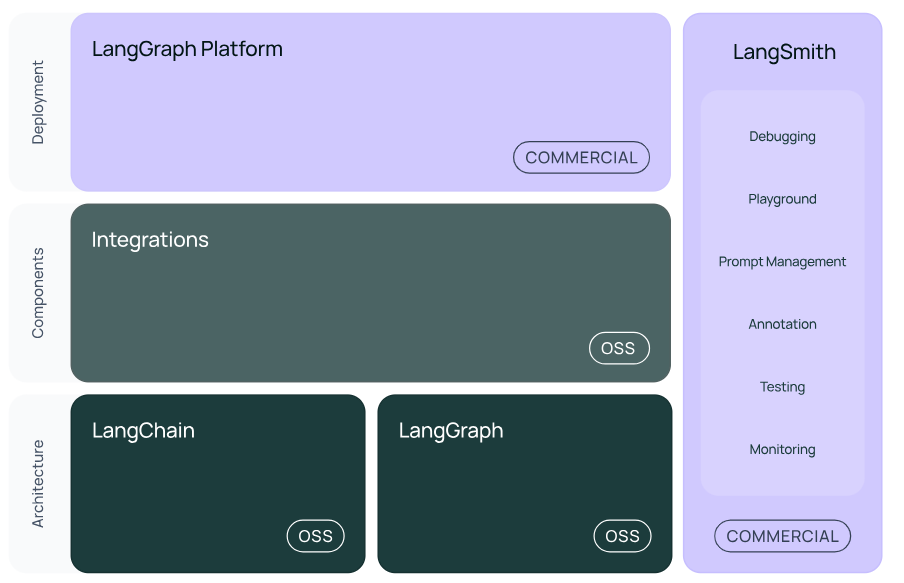
LangChain's services providing a language model–based framework
However, as LLM-powered projects have grown in scale,
complex requirements that were previously unnecessary have begun to surface —
such as workflows capable of managing multiple agents and unified database management.
LangGraph is a workflow design tool built to address these requirements effectively.
It is built on graph-based Nodes and Edges, enabling effective state management for each individual Node.
This makes it possible to design complex workflows that would be difficult to implement in LangChain alone.
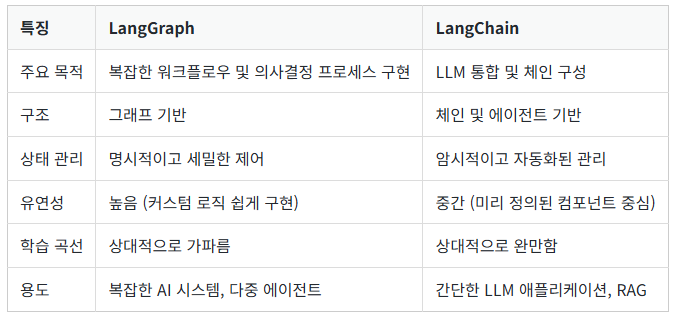
The difference between LangGraph and LangChain (LangGraph Guidebook — Agentic RAG with LangGraph)
2. Chains vs. Agents
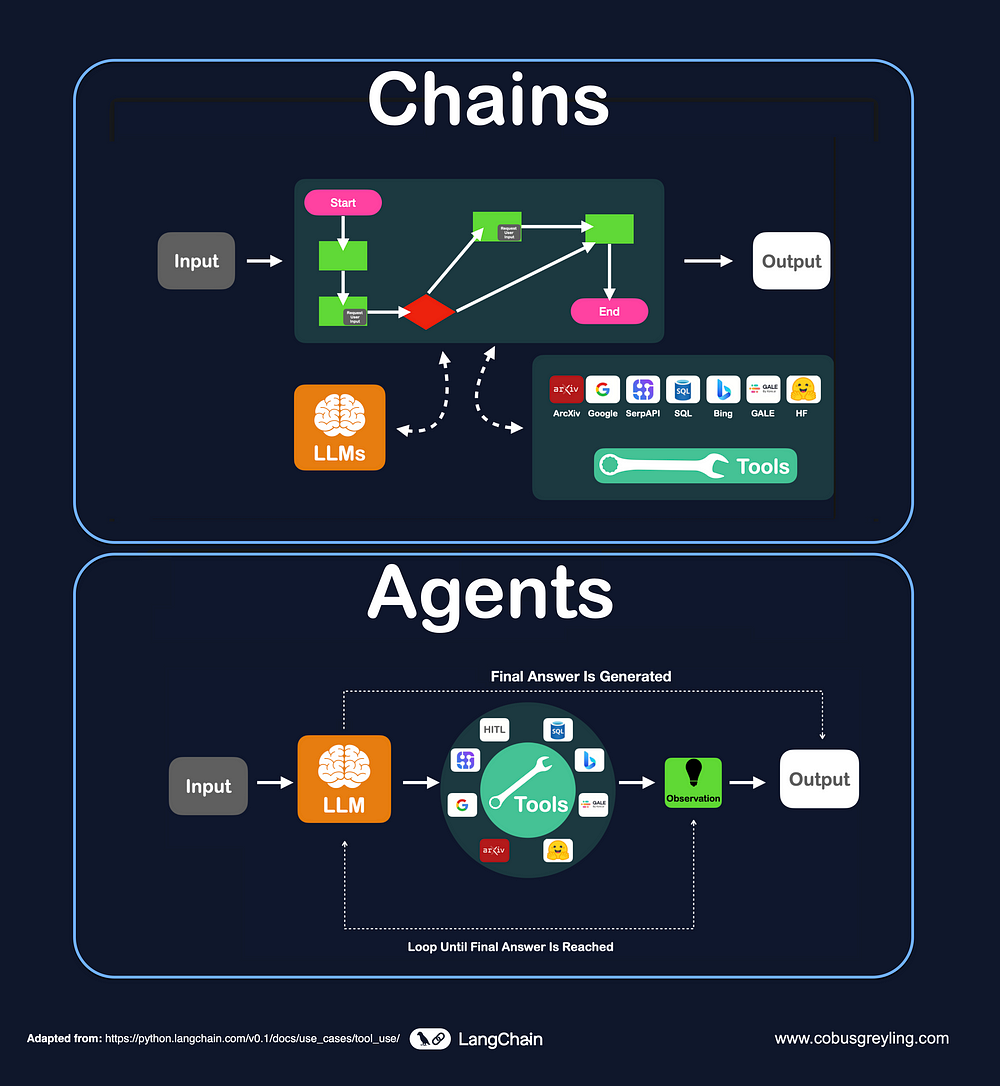
Chains vs. Agents
Before diving into LangChain and LangGraph, it's worth understanding the concepts of Chains and Agents.
Chains and Agents can be thought of as the basic units of work in an LLM application, distinguished by how they operate.
The LangChainAI Webinar describes them as follows:
- Chain: "A predetermined string of actions"
- Agent: "Using the LLM to decide which actions to take"
A Chain is a rule-based unit of work that executes a fixed sequence of steps in order,
while an Agent is an LLM-driven unit of work that determines which actions to perform.

Differences between Chains and Agents
Neither is inherently superior; what matters is choosing the right one for the task at hand.
LangGraph emerged as a way to use both appropriately — though, to be fair,
LangChain alone is generally sufficient for designing Chains and Agents effectively.
The problem is that as the number of LLM modules grows, managing overall state becomes considerably more complex,
and LangGraph was introduced as a workflow solution to address exactly that problem.
3. Why LangGraph?
At this point, the purpose of LangGraph should be clear.
You might think of it as: "A tool for managing complex applications built with Chains and Agents." And that's essentially right.
LangGraph's core capability is unified management through graph-based connections,
but there is an additional advantage in scenarios where LLMs are involved — specifically, where both Agents and Chains coexist.
That advantage is state-based management, which simultaneously increases Agent autonomy (control)
while ensuring the reliability of LLM modules.
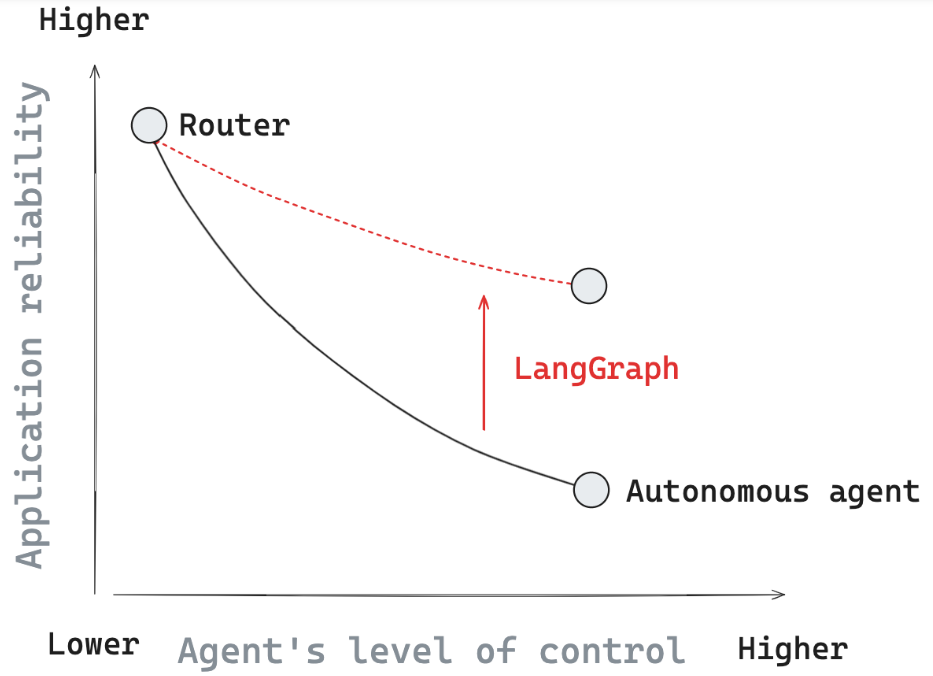
The core of LangGraph
Consider the following example.
Suppose you have a multi-step task and need an LLM to decide which step to execute next.
There are two broad approaches:
- Have the LLM choose between a fixed set of paths (Router-style)
- Have the LLM decide which tool to call (Fully Autonomous-style)
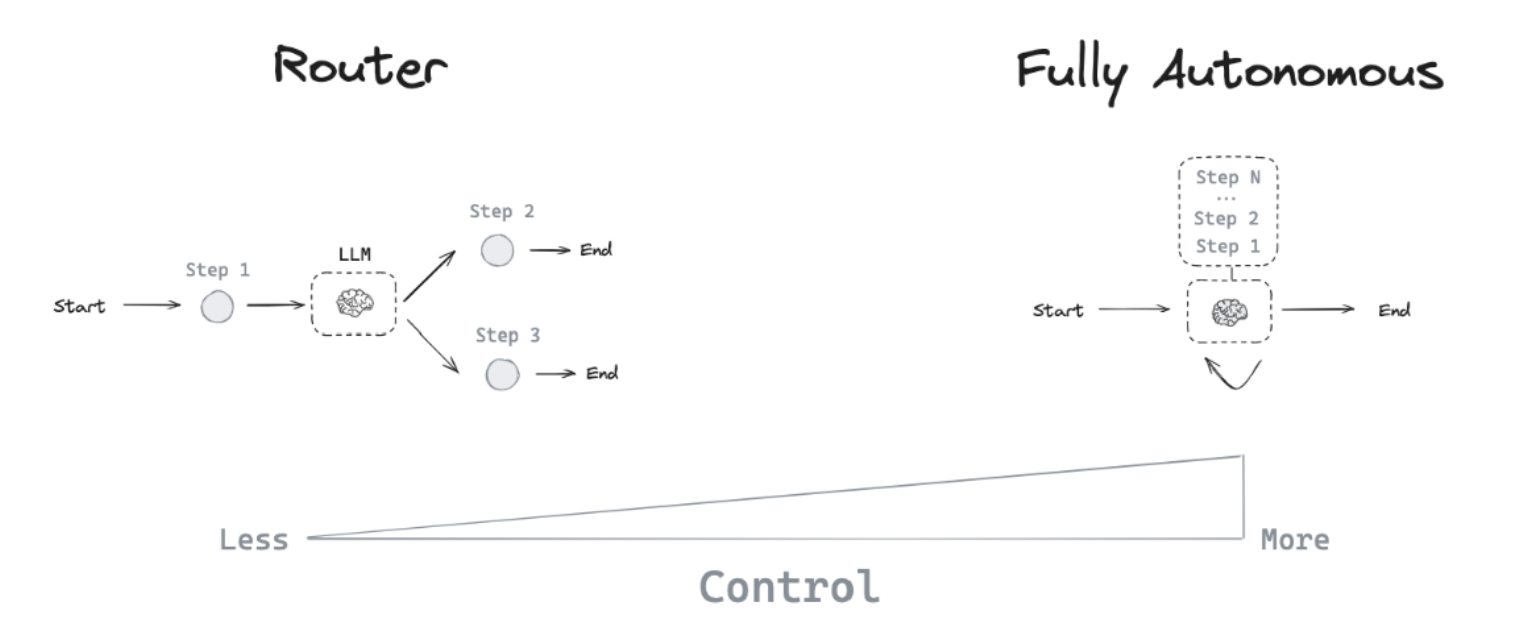
Decision-making approaches for solving a problem
The Router approach is essentially a Chain, where the LLM selects from a predefined set of routes.
This is robust and stable, but it constrains the LLM to mechanical execution rather than organic decision-making.
The fully autonomous Agent approach, on the other hand, gives the system much more adaptive capability,
but the dramatic reduction in stability can seriously undermine the reliability of a production service.
This is the core challenge LangGraph aims to solve,
and it addresses it through graph-based connectivity combined with state-based lifecycle management.
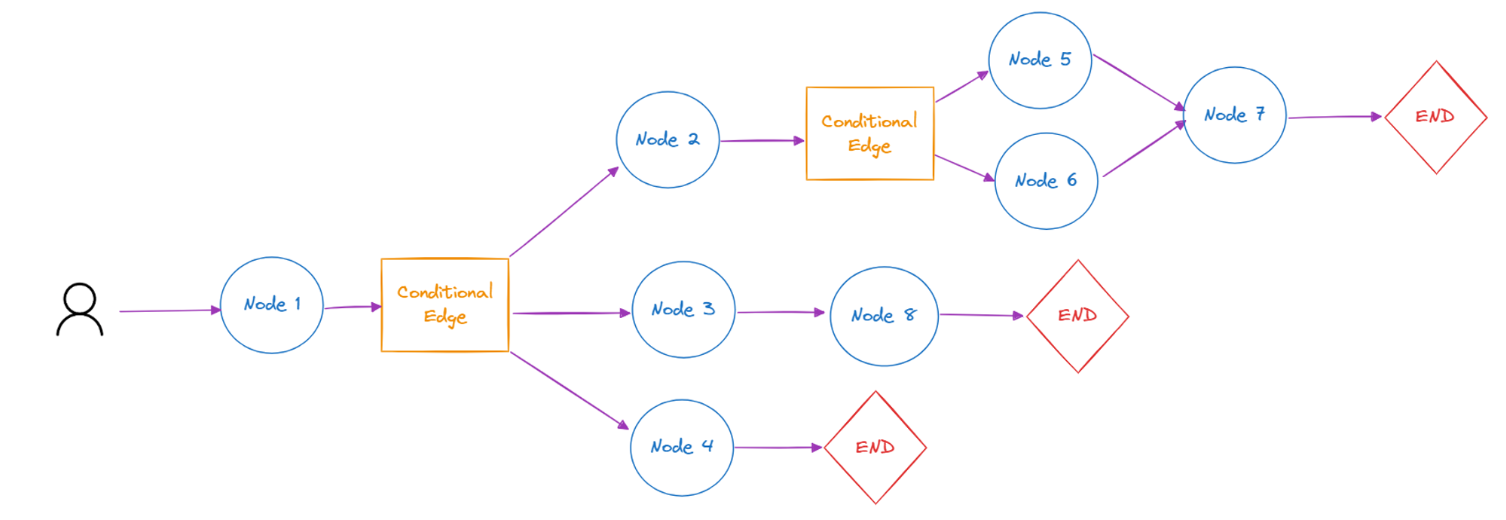
Building an end-to-end workflow with Nodes, Edges, and State
4. The Core of LangGraph
LangGraph's core glossary comes down to three terms:
- State: A shared data structure that represents the current state of the entire application.
- Nodes: Functions that encode agent logic — they receive State as input, perform some operation, and return an updated State.
- Edges: Functions that determine which Node to execute next based on the current State — either as fixed transitions or conditional branches.
Let's walk through the simplest possible example.
# State의 예시

class InputState(TypedDict):
    user_input: str

class OutputState(TypedDict):
    graph_output: str

class OverallState(TypedDict):
    foo: str
    user_input: str
    graph_output: str

class PrivateState(TypedDict):
    bar: str
State is the foundational element of LangGraph — it defines the schema of the graph.
Every State explicitly declares which fields it has access to.
# 위에서 정의된 State를 통해 Node를 정의
def node_1(state: InputState) -> OverallState:
    # Write to OverallState
    return {"foo": state["user_input"] + " name"}

def node_2(state: OverallState) -> PrivateState:
    # Read from OverallState, write to PrivateState
    return {"bar": state["foo"] + " is"}

def node_3(state: PrivateState) -> OutputState:
    # Read from PrivateState, write to OutputState
    return {"graph_output": state["bar"] + " Lance"}

# Builder 생성
builder = StateGraph(OverallState,input=InputState,output=OutputState)

# Builder에 Node를 추가
builder.add_node("node_1", node_1)
builder.add_node("node_2", node_2)
builder.add_node("node_3", node_3)
Once the State is defined, the Nodes that operate on it are defined next.
As mentioned earlier, each Node takes a State as input and returns a different State as output.
In doing so, each Node performs a specific function — in this example, it's simply string concatenation.
# Edge를 추가
builder.add_edge(START, "node_1")
builder.add_edge("node_1", "node_2")
builder.add_edge("node_2", "node_3")
builder.add_edge("node_3", END)

# Builder를 통해 Graph 컴파일
graph = builder.compile()
graph.invoke({"user_input":"My"})
{'graph_output': 'My name is Lance'}
Finally, Nodes are added to the graph and connected via Edges.
An Edge is defined simply by specifying the source Node and the destination Node.
The start and end of the graph are represented by the START and END classes, respectively.
This post covered the fundamental concepts behind LangChain and LangGraph, along with the simplest possible workflow built on them.
The next post will take a closer look through a practical task implemented with LangGraph and LangChain.